Placeholder Content Image

Tropical banana cake with salted peanut caramel sauce

<p>If you’re really looking to go all out, this tropical banana cake with salted peanut caramel sauce is a striking dessert that tastes as good as it looks. If there are any leftovers of, they will keep for a few days in the fridge.</p> <p><strong><span style="text-decoration: underline;">Serves:</span></strong> Six to eight</p> <p><strong><span style="text-decoration: underline;">Ingredients:</span></strong></p> <p><em>Banana cake</em></p> <ul> <li>125g butter, softened</li> <li>1 cup brown sugar</li> <li>1 teaspoon vanilla extract</li> <li>2 tablespoons rum</li> <li>2 eggs</li> <li>3 ripe bananas, mashed</li> <li>1/4 cup coconut milk</li> <li>1/2 cup desiccated coconut</li> <li>1/2 cup chopped tropical dried fruits, plus extra for garnish</li> <li>2 cups self-raising flour</li> </ul> <p><em>Salted peanut caramel sauce</em></p> <ul> <li>200g caster sugar</li> <li>60ml (4 tablespoons) water</li> <li>60g butter, cut into small cubes</li> <li>1/2 cup cream</li> <li>1 teaspoon soy sauce</li> <li>80g salted roasted peanuts, roughly chopped</li> </ul> <p><em>Filling</em></p> <ul> <li>300ml cream</li> <li>1 tablespoon icing sugar</li> <li>250g sour cream, whisked</li> <li>2 bananas, sliced, tossed in a little lemon or lime juice to prevent browning</li> </ul> <p><strong><span style="text-decoration: underline;">Method:</span></strong></p> <ol> <li>Heat oven to 180°C. Grease and line the base of a 22cm spring-form tin.</li> <li>Cream butter and brown sugar together. Add vanilla and rum, beating to combine. Beat in eggs, mashed bananas and coconut milk. Add desiccated coconut and dried fruits, sift the flour over and gently fold to combine. </li> <li>Spoon into prepared tin and bake 45-50 minutes or until a skewer inserted in the middle comes out clean. Allow to cool. The cake can be made the day before it is needed.</li> <li>For the sauce, place caster sugar and water in a small saucepan and swirl the pan over a medium-high heat until sugar dissolves.</li> <li>Bring to the boil and cook, swirling the pan occasionally, until a rich caramel colour. Add butter carefully (mixture may spit) and whisk to combine.</li> <li>Add cream and soy sauce, whisking to combine.</li> <li>Add half the chopped peanuts. Serve immediately or leave covered on the bench (the sauce will become solid if refrigerated). </li> <li>For the filling, whip cream with icing sugar then mix into whisked sour cream.</li> <li>Keep chilled until needed. </li> <li>To assemble, split the cold cake and cover the bottom piece with a layer of sliced banana. Top with half the cream mixture then add the other layer of cake.</li> <li>Cover the top with remaining cream and garnish with remaining peanuts and extra dried tropical fruits. Pour over the caramel sauce and serve.</li> </ol> <p><em>Written by Bernadette Hogg. First appeared on <a href="http://www.stuff.co.nz/" target="_blank" rel="noopener"><strong><span>Stuff.co.nz</span></strong></a>.</em></p> <p><em>Images: Shutterstock</em></p>

Food & Wine

Placeholder Content Image

Super simple cake decorating ideas

<p>Whether you’re making a cake for a special occasion or simply want to create something extra fancy for a family dinner, you’d be surprised how easy it can be to decorate a cake into something fit for a cooking show. Whether it’s using a few store-bought meringues, slicing up some strawberries or using your favourite biscuits to make a balloon feature, you’ll never make a plain old cake again after reading our super simple cake decorating ideas.</p> <p><strong>Meringue on the mind</strong><br />For an effective alternative to piped-frosting rosettes or expensive store-bought edible roses, opt for some mini meringues from the supermarket. Use them around the edge of the cake for a simple yet stylish finish that packs a crunchy punch.</p> <p><strong>Up, up and away with cookies</strong><br />Whether you want to make biscuits of your own or buy your favourite biccies from the shop, once you’ve iced your cake arrange a cluster of biscuits nearer to one end of the cake and use liquorice shoestrings (or another thin long lolly of your choosing) to form the balloon strings coming from the biscuits. You may want to knot the strings for extra detail. Another tip you may want to use is, if your biscuits are on the plan side, cover them in different colour frostings and then decorate them with colours sprinkles.</p> <p><strong>Strawberry fields</strong><br />Sometimes things in your very own fridge make the perfect cake decorations. Strawberries not only taste delicious and fresh, their vibrant colour makes them an eye-catching decoration. Thinly slice one punnet of fresh strawberries. Starting from the outside perimeter, place a ring of strawberries around the cake, pointed facing out. Continue layering rings around the cake until you reach the centre.</p> <p><strong>Shaved Chocolate</strong><br />For all the chocoholics out there, this one’s for you. A decadent way to decorate a cake is with shavings of chocolate. If you’re worried you won’t be so good at making your own shavings, some stores do sell them. You can mix and match milk, white and dark chocolate and even throw in a few different flavours – think orange, mint or chilli chocolate. While there are many ways you can arrange the shavings, the circular, ring-type layering described above in strawberry fields works well.</p> <p><strong>Spotty dotty</strong><br />Polka dots are all the rage and white frosting dots on a cake that has been iced in a pale colour, will look extremely lovely. For neatly piped dots, you’ll want to use a pastry bag. Hold the pastry bag in both hands; keep the tip just above the cake's surface, at a slight angle. Gently squeeze out icing, release, and pull back. Frosting dots will also help to hide smudged edges or spotty icing. You can either use different size dots or big and small ones. But whatever you do, start with the large ones.</p> <p><em>Images: Getty</em></p>

Food & Wine

Placeholder Content Image

“What do I actually do?”: Woman’s costly chocolate-coated crisis

<p>A woman in the United States has been left with quite the mess on her hands after her cake order took a questionable - and rather expensive -  turn. </p> <p>In a video posted to TikTok, by user @libbycarlsonn, she revealed what had become of her $300 USD (~$443 AUD/NZD) request after it had been dropped off by the baker.</p> <p>The clip featured her with a hand covering her face and the text “guys I paid $300 for this and the lady just dropped it off what do I actually do” across the top of the screen. </p> <p>It continued on to show an image of a carefully constructed chocolate cake, the one that the TikToker had been hoping to receive, and concluded with what she’d actually been delivered: something best described as a sort of chocolate avalanche, with chocolate melting down haphazardly placed chunks of cake, and a dusting of sprinkles over it all. </p> <p>“TikTok, work your magic because I need advice right now," her caption read. </p> <p>The video gained over 3.7m views, and over 4,000 comments, though most weren’t offering advice so much as commiserating with her, or poking fun at the sillier side of her situation, and many were of the opinion that she should demand a refund immediately. </p> <p>“When you say dropped it off, did she literally drop it?” one user wanted to know. “Also how is that the same as the one in the photo??? HOW?”</p> <p>Another pressing concern came soon after, with someone asking “why are there sprinkles???”</p> <p>“Put it in the fridge probably just melted a bit,” one suggested. </p> <p>“No way that’s what they gave you!! I would’ve flip[ped] that cake onto their face. Wow!!” another said. </p> <p>“Tbf…. I prefer the disaster cake,” one shared, “it looks tastier but I’d definitely ask for a refund.”</p> <p>Another felt quite strongly about that, telling the TikToker “well obviously it's false advertising and that's illegal”.</p> <p>One, however, simply refused to accept that the story was true, writing “I’m sorry I literally do not believe you”.</p> <p>“Girl you made that. Quit playing! Lol,” another agreed. </p> <p>And as one said, “honestly, there’s no way this is true or you dropped it before posting.”</p> <p><em>Images: TikTok</em></p>

Food & Wine

Placeholder Content Image

“Grandma meant Elmo”: Cake-maker reveals hilarious baking blunder

<p>An American baker has left the internet in stitches after misreading her customer’s custom cake request, instead delivering a baking blunder for the Sesame Street history books.</p> <p>In a video posted to her TikTok account, Brianna Romero - who is known professionally as Brinni Cakes - confessed her mistake to the world, recounting the story of how a recent order from a grandmother had led her to the creation of her new friend ‘Emo Elmo’.</p> <p>“So my worst nightmare happened,” she said, with audio playing over a timelapse of Brianne constructing another cake. “Last week a lady DMed me and asked me if I could make her an emo cake, and I was thinking ‘yes, of course, I love emo and I love goth, and I know I’ve been perfecting my black frosting so I’m ready for this’.” </p> <p>Brianna went on to explain that she’d gotten all of her customer’s information, and set to work. However, an hour before she was set to deliver the cake, she decided to offer the woman a number candle - an offer that was soon accepted. </p> <p>“She said ‘yes, the cake is for my granddaughter and she’s turning four’”, Brianna explained in the clip. “And I thought that that was a little bit weird, ‘cause I don’t know an emo four year old.”</p> <p>After trying to understand the weird request, Brianna figured that the little girl must just be a fan of something like Netflix’s Wednesday series. Unfortunately, this was not the case. </p> <p>“Something felt wrong,” she noted, before describing how she’d reach out again to ask what the theme of the party was, only to find out it was Sesame Street. </p> <p>“So my heart sinks a little bit because this is now making sense to me,” she said. It was then that Brianna returned to the original exchange between herself and her customer, and had her worst fears confirmed. </p> <p>“I misread emo,” Brianna admitted, “and it said an Elmo cake.”</p> <p>Luckily, Brianna was a quick thinker in her time of stress and rushed out to find an Elmo topper for her cake, before offering the cake for free.</p> <div class="embed" style="box-sizing: inherit; margin: 0px; padding: 0px; border: 0px; font-size: 16px; vertical-align: baseline; outline: none !important;"><iframe class="embedly-embed" style="box-sizing: inherit; margin: 0px; padding: 0px; border-width: 0px; border-style: initial; vertical-align: baseline; width: 610.266px; max-width: 100%; outline: none !important;" title="tiktok embed" src="https://cdn.embedly.com/widgets/media.html?src=https%3A%2F%2Fwww.tiktok.com%2Fembed%2Fv2%2F7212109376436391210&amp;display_name=tiktok&amp;url=https%3A%2F%2Fwww.tiktok.com%2F%40brinnicakes%2Fvideo%2F7212109376436391210&amp;image=https%3A%2F%2Fp16-sign.tiktokcdn-us.com%2Ftos-useast5-p-0068-tx%2Fe19d4562cc04495c8778154678f1d382_1679200086%7Etplv-dmt-logom%3Atos-useast5-i-0068-tx%2F1ad8d307d5f74948880bf2e0f91228f3.image%3Fx-expires%3D1683669600%26x-signature%3DCxdjPe36YRrx4SrRRwvAPwRsevY%253D&amp;key=5b465a7e134d4f09b4e6901220de11f0&amp;type=text%2Fhtml&amp;schema=tiktok" width="340" height="700" frameborder="0" scrolling="no" allowfullscreen="allowfullscreen"></iframe></div> <p> </p> <p>Brianna’s audience were obsessed with her tale, and the video shot to viral heights, with over 11.7 million views to its name. </p> <p>“As soon as you revealed it was for a 4yr old I was like ‘oh no, grandma meant Elmo’,” one follower wrote. </p> <p>“Praying it’s Elmo with a side bang,” said another. </p> <p>Her misfortune drew in over a thousand comments, but there was a recurring thought that stood out among the chorus, and that was a request to see the baked blunder. </p> <p>And while Brianna admitted in an update that she hadn’t had the time to snap pictures on the day of delivery, she did her best with her follow-up video, sharing photos of cakes that looked “almost exactly” like her own, to the delight of her worldwide audience. </p> <p>“This is so funny,” someone said. “Elmo with a side bang has me in tears.”</p> <p>Meanwhile, another commenter wanted to know what the recipients had thought about their unique goods. </p> <p>“She tried to pay still but I told her everything that happened and we just laughed it off,” Brianna said. “It was just for a small family party anyway.”</p> <p><em>Images: TikTok</em></p>

Food & Wine

Placeholder Content Image

Lemon curd and cream sponge cake

<p>Not only is this cake beautiful, but homemade lemon curd and cream sandwiched between lovely sponge cakes, it will exceed all expectations.</p> <p><strong><span style="text-decoration: underline;">Serves:</span> </strong>12</p> <p><strong><span style="text-decoration: underline;">Ingredients:</span></strong></p> <ul> <li>350g butter, softened, plus extra for greasing <ul> <li>350g caster sugar</li> <li>4 lemons, zest only, plus juice of 2 lemons</li> <li>3 large pieces candied lemon peel, finely chopped</li> <li>6 free-range eggs</li> <li>3 teaspoon baking powder</li> <li>300g self-raising flour</li> <li>50g cornflour</li> </ul> </li> </ul> <p><em>Lemon curd</em></p> <ul> <li>60g butter</li> <li>225g caster sugar</li> <li>3 lemons, juice and zest</li> <li>2 free-range eggs</li> </ul> <p><em>Cream</em></p> <ul> <li>300ml double cream</li> <li>200g icing sugar, sifted, plus extra for dusting</li> </ul> <p><strong><span style="text-decoration: underline;">Method:</span></strong></p> <p>1. Preheat the oven to 180°C. Grease and line two cake tins.</p> <p>2. In a bowl, cream the butter and sugar until pale and fluffy. Add the lemon zest and juice and candied peel.</p> <p>3. Slowly beat in the eggs, one at a time, until the mixture is well combined.</p> <p>4. Sift the baking powder, self-raising flour and corn flour together in a bowl and fold into the cake mixture.</p> <p>5. Divide the cake mixture evenly between the two cake tins and bake for 25 to 30 minutes or until risen and golden-brown. Remove from the oven and set aside to cool for 10 minutes. Run a round-bladed knife around the inside edge of the tins to loosen the cakes. Remove the cakes from the tins and set aside to cool completely on a rack.</p> <p>6. Meanwhile, to make the lemon curd heat the butter, sugar and lemon juice and zest in a bowl set over a pan of simmering water, stirring occasionally until the butter has melted and the sugar has dissolved. Be sure not allow the base of the bowl to touch the surface of the water. Remove from the heat.</p> <p>7. Meanwhile, beat the eggs in a separate bowl. Slowly whisk the melted butter mixture into the beaten eggs until well combined.</p> <p>8. Set the bowl over the pan of simmering water and cook, whisking constantly, for two to three minutes or until the mixture thickens enough to coat the back of a spoon.</p> <p>9. Sieve the lemon curd into a clean bowl, then cover with cling film and set aside to cool.</p> <p>10. For the cream, whip the cream and icing sugar together in a bowl until soft peaks form when the whisk is removed.</p> <p>11. Place one of the cakes onto a serving plate and spread with the lemon curd. Spread over some of the whipped cream and sandwich with another cake. Drizzle the top of cake with lemon curd and let it run over the edges.</p> <p><em>Images: Shutterstock</em></p>

Food & Wine

Placeholder Content Image

“Lunch-box-mum queen”: Woman goes viral over 2 ingredient cake mix

<p dir="ltr">One Coles shopper has taken the internet by storm, revealing a “snack hack” with just two ingredients.</p> <p dir="ltr">Aussie mum-of-three Claudia creates content on TikTok on cheap Kmart buys, a day in the life of her family, and her most popular videos, her “snack hacks”.</p> <p dir="ltr">For her most recent hack, only two ingredients are required.</p> <p dir="ltr">“Snack hack! Again!” she said in the video, which has attracted more than 70,000 views on TikTok.</p> <p dir="ltr">“So, this one, I’m looking forward to.</p> <p dir="ltr">“This is not healthy. This is two ingredients — Nutella and eggs — and it’s supposed to make the gooiest, chocolatiest, yummiest cake ever.</p> <p dir="ltr">“I have not tried this before so let’s get to it.”</p> <p dir="ltr">Claudia didn’t have Nutella in her pantry, but she bought the Coles version, which she claims tastes very similar.</p> <p dir="ltr">“I’m a big believer in using what you have, but a few people said ‘check this out, make this, it’s delicious’ so I just had to,” she continued.</p> <p dir="ltr">“I did go and buy the Coles one, and it was very cheap, and I’m sure a lot of people do have Nutella in their cupboard.”</p> <p dir="ltr">For the snack hack, Claudia used one cup of the chocolate spread and four eggs to create a gooey cake mix.</p> <p dir="ltr">“If ‘trust the process’ had a cover photo, it would be this,” she said, visibly grossed out by the gooey batter.</p> <p dir="ltr">“It is safe to say I won’t be trying any of this cake mix.”</p> <p dir="ltr">Claudia instructed viewers to put the cake in the oven for 20-25 minutes at 180 degrees Celsius.</p> <p dir="ltr">“Do you know how good this smells?” she said as she took the cake tin out of the oven.</p> <p dir="ltr">She was even more excited by the time she tried it. </p> <p dir="ltr">“That is so good. So, so good. Like no exaggeration. So freaking good,” she said.</p> <p dir="ltr">People flooded the comments, applauding Claudia for another great “snack hack”. </p> <p dir="ltr">“I’m soooo trying this,” one person wrote.</p> <p dir="ltr">“Thank you, lunch-box-mum queen,” another added.</p> <p dir="ltr">“I honestly thought it was going to come out looking like chocolate scrambled eggs,” a third said.</p> <p dir="ltr">Claudia is renowned on TikTok for making snacks that are easy on household budgets, so people were grateful she used the cheaper Coles chocolate spread. </p> <p dir="ltr">“The Coles Nutella is just as good in my opinion,” one wrote.</p> <p dir="ltr"><em>Image credit: TikTok</em></p>

Food & Wine

Placeholder Content Image

Jam roly-poly

<p>Looking for the perfect sweet treat to have with your cuppa? Look no further than this old-school classic, the infamous jam roly-poly. Forget the supermarket-bought awful incarnations, this is easy to make and is quite affordable too.</p> <p><strong>Ingredients:</strong></p> <ul> <li>Butter for greasing</li> <li>50g salted butter, chilled and cut into chunks</li> <li>250g self-raising flour, plus extra for rolling</li> <li>1 vanilla pod, seeds scraped out</li> <li>50g shredded suet</li> <li>150ml milk</li> <li>100g raspberry</li> <li>Ice-cream or custard to serve                   </li> </ul> <p><span style="text-decoration: underline;"><strong>Method:</strong></span></p> <ol> <li>Put a roasting tin onto the bottom shelf of the oven, with another wire shelf directly above it. Fill the roasting tin with two-thirds boiling water from the kettle, then carefully slide it back in. Heat oven to 180C. </li> <li>Tear off a large sheet of foil and greaseproof paper (approx. 30cm by 40cm). Sit the paper on top of the foil and butter it. </li> <li>Put butter, flour and vanilla seeds into a food processor; pulse until the butter has disappeared. Tip into a mixing bowl. </li> <li>Add the suet and stir through, pour in the milk and work together with a cutlery knife until you get a sticky dough. You may need a little more milk, depending on your flour. </li> <li>Tip the dough out onto a floured surface, quickly pat together to smooth, then roll out to a square roughly 25cm to 25cm. </li> <li>Spread the jam all over, leaving a gap along one edge, then roll up from the opposite edge. Pinch the jam-free edge into the dough where it meets, and pinch the ends roughly, too. </li> <li>Carefully lift onto the greased paper, join-side down, loosely bring up the paper and foil around it, then scrunch together along the edges and ends to seal. The roly-poly will puff quite a bit during cooking so don’t wrap it tightly. Lift the parcel directly onto the rack above the tin and cook for one hour. </li> <li>Let the roly-poly sit for five minutes before unwrapping, then carefully open the foil and paper, and thickly slice to serve. </li> <li>Serve with ice-cream or custard and you'll have some very satisfied guests on your hands.</li> </ol> <p><em>Images: Shutterstock</em></p>

Food & Wine

Placeholder Content Image

“The stuff of nightmares”: Baked to imperfection

<p>Some people are destined for the kitchen, while others may be better suited to a career in comedy, if these cake decorating disasters are anything to go by.</p> <p>Even armed with a visual guide and the world’s best intentions, some bakers are just in for a wild time - and thanks to some good-natured social media posts, we can all enjoy the colourful consequences right along with them. </p> 
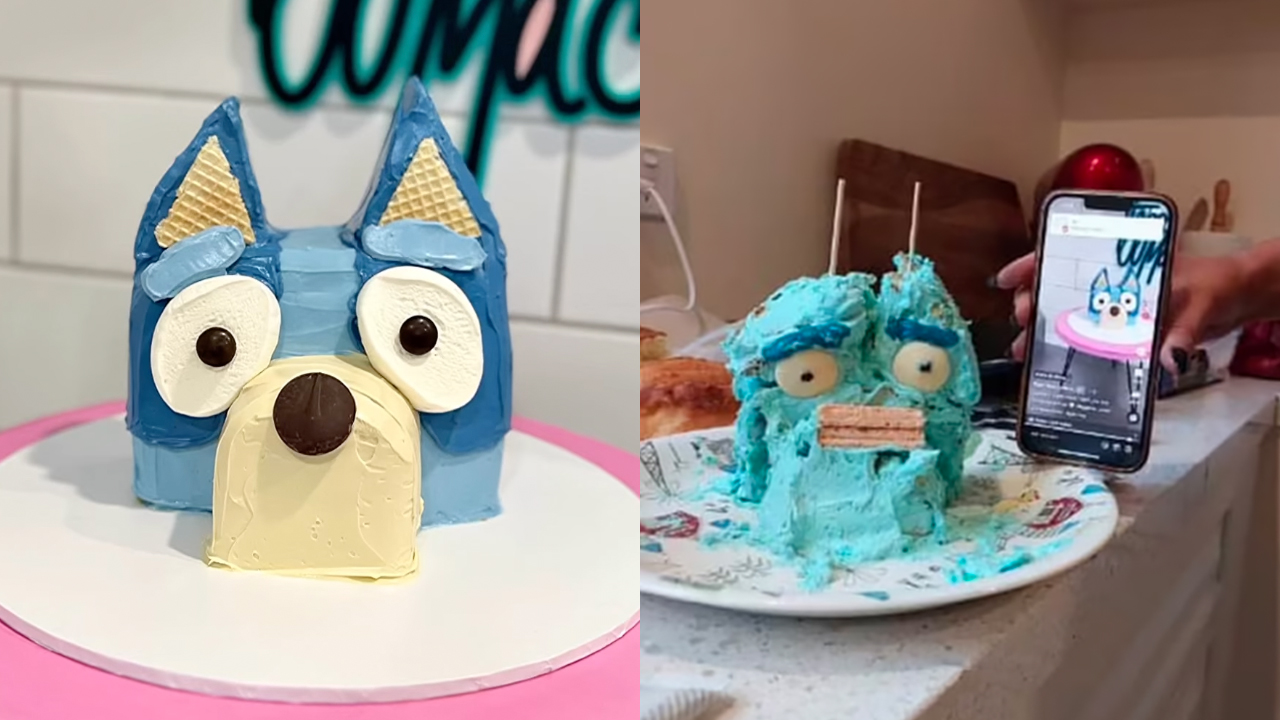
<p>Lucy was one such baker to face a betrayal from her cake. Posting to the Facebook page Woolies/Coles Mudcake Hacks, she shared her experience trying to follow professional baker Tegan ‘Tigga’ Maccormack’s Bluey birthday cake tutorial. </p> <p>Needless to say, their end results weren’t exactly mirror images.</p> <p>"Enjoy this absolute abomination - it looked easy on TikTok," Lucy wrote, attaching a picture of her hilarious creation. </p> <p>Fellow Facebook users loved her attempt, with some even trying to make Lucy feel better.</p> <p>One informed her that although it was nothing like the inspiration picture, it was “very cute”.</p> <p>“OMG I genuinely love it!” another declared. “It made me smile, thank you for sharing.”</p> <p>Meanwhile, one mum wrote that her seven-year-old encouraged Lucy to “keep trying!”, before stating that “it looks so bad she should probably eat the whole thing.” </p> 
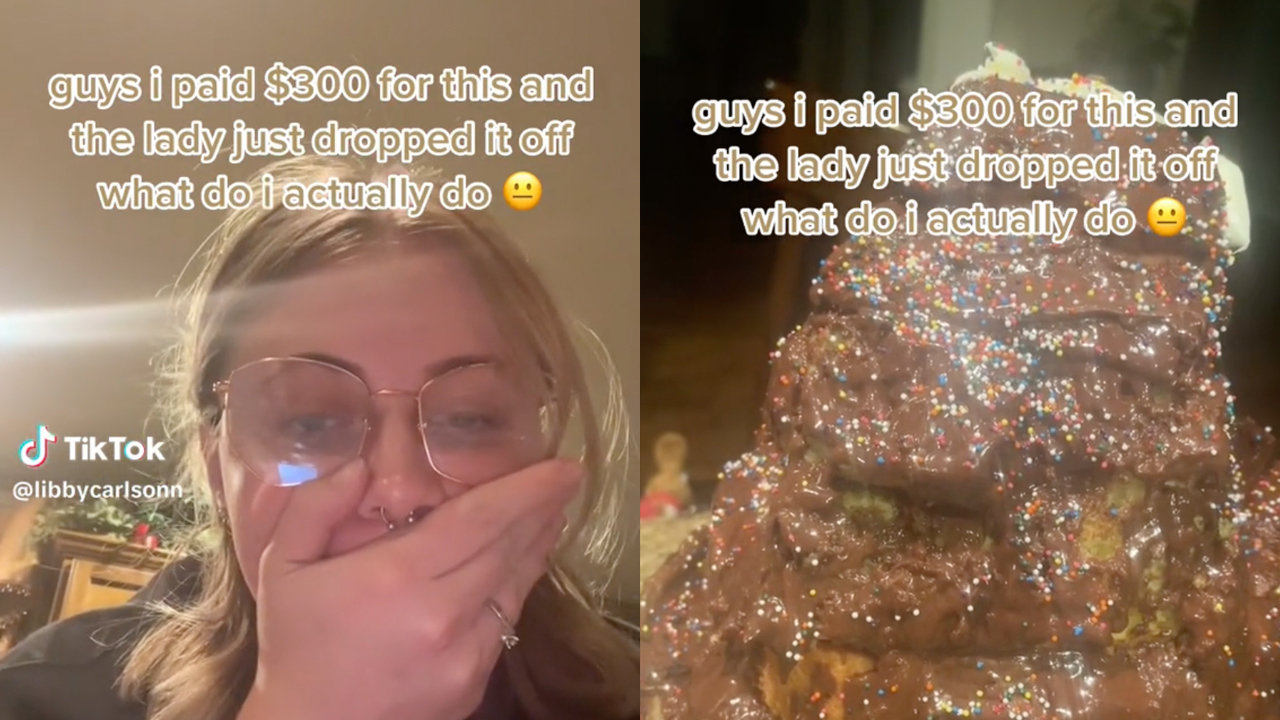
<p>On Reddit, someone had another unfortunate cake story to share - though this time they weren’t the baker responsible, simply the customer who got something they certainly hadn’t paid for. </p> <p>“The ice cream cake we ordered vs what we received,” they wrote, sharing the image of two monkey cakes. One, the ‘expectation’ image, was a smoothly iced monkey head. The second, the ‘received’ product, was at least discernible as a monkey, even if the ‘smooth’ icing job left a lot to be desired. </p> <p>“This was an ice cream cake from Baskin Robbins," it was explained. “They usually come out exactly as pictured online, but this time was truly spectacular."</p> <p>And while many thought this particular approach to replicating the vision was hilarious, most were of the opinion that this had not actually been a failure, but instead an improvement. According to the majority in the comments, “frosting tastes much better than fondant” anyway.</p> 
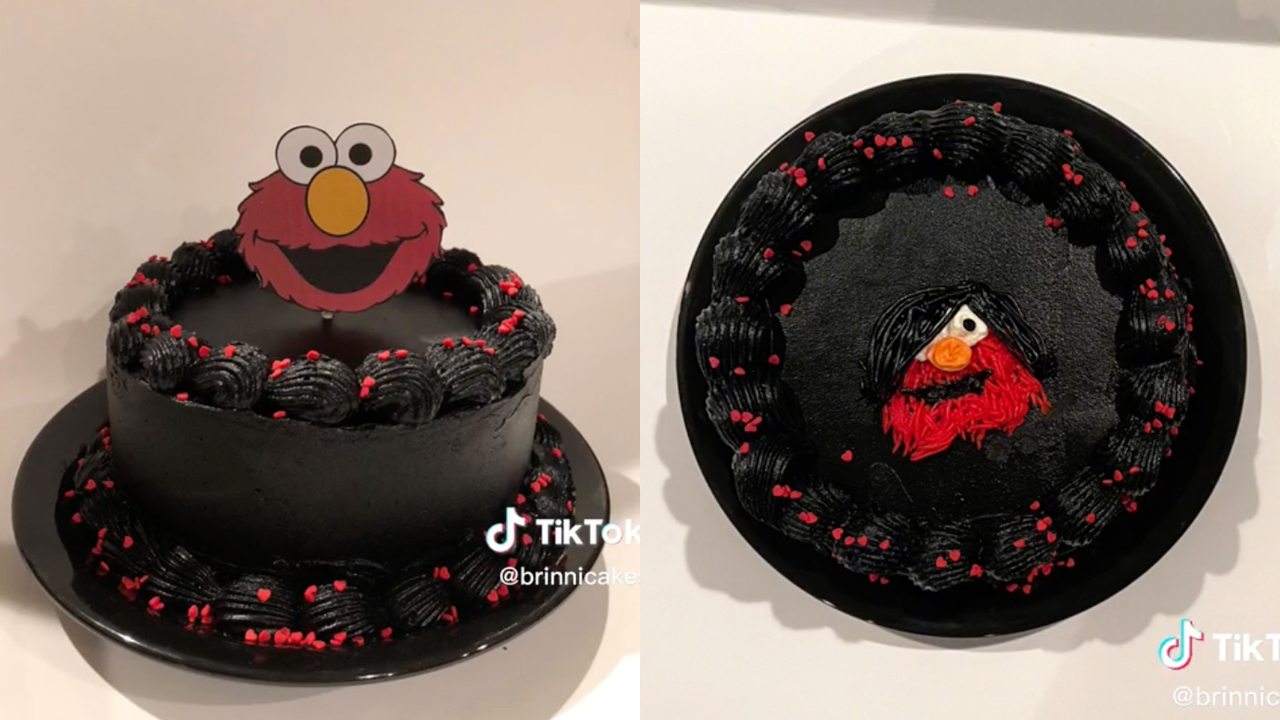
<p>Another Reddit user referenced a tweet they’d seen of another cake disaster, this time of a Minnie Mouse cake that someone had purchased for their niece, and the nightmare they’d gotten in return. </p> <p>“I saw that it was posted in Arabic on Twitter, and it was pretty funny,” the Reddit user said, “so I just wanted to share it with a wider audience!"</p> <p>“The cake's shininess is the stuff of nightmares,” was all one had to say about it. </p> <p>“I would not have paid for that abomination,” another said. </p> <p>Thankfully for the individual who had dealt with the cake firsthand, they were able to return it for a full refund. </p> <p>"The cake was for my sister for her birthday," they told TODAY. "In the beginning, it was a horrible shock for us, but after I posted the picture on Twitter, I was laughing because of people's reactions."</p> <p><em>Images: Instagram, Facebook, Reddit, Shutterstock</em></p>

Food & Wine

Placeholder Content Image

Don’t say cheese! Travel destinations where photos are illegal

<p dir="ltr">While many happy travellers love to immortalise their holiday with a collection of photos, there are some places that don’t allow for pics to be taken. </p> <p dir="ltr">In several destinations across the globe, tourists are actually banned from taking selfies and can even get fined for breaking the rules.</p> <p dir="ltr">So before you pull out your camera and strike a pose, you might want to check if what you’re snapping a photo of is legal. </p> <p dir="ltr">Here are just a few places where taking photos isn’t allowed. </p> <p><strong>The Sistine Chapel, Vatican City</strong></p> <p dir="ltr">The use of professional cameras and phones is strictly prohibited in the Sistine Chapel so don't even think about it. </p> <p dir="ltr">According to <a href="https://www.vaticancitytours.it/blog/are-cameras-allowed-in-the-vatican-city/#:~:text=Sistine%20Chapel&amp;text=The%20real%20reason%20for%20the,companies%20to%20fund%20the%20project.">VaticanCityTours,</a> the reason you can't take pictures dates back to 1980 when the chapel was restored due to damage caused by flash photography. </p> <p dir="ltr"><strong>Mecca Pilgrimage, Saudi Arabia</strong></p> <p dir="ltr">In Saudi Arabia, it is against the law to take photos of worshippers during Hajj, otherwise known as their pilgrimage to the holy city of Mecca. </p> <p>This is due to it being disrespectful to snap people while they are on their religious journey. </p> <p dir="ltr"><strong>The Blue Mosque, Turkey</strong></p> <p>Taking a photo of the outside of the iconic Blue Mosque is totally okay, but snapping any photos of the interior is a big no. </p> <p>Visitors also must follow strict dress codes as well as other rules and regulations.</p> <p dir="ltr"><strong>Anne Frank's House, Amsterdam</strong></p> <p>Taking photos or selfies in the House of Anne Frank is not allowed inside the museum due to its serious nature.</p> <p>There is a very sombre mood within the historical house, making it a time for reflection, not for flash photography. </p> <p dir="ltr"><strong>Palace of Versailles, France</strong></p> <p>Photos of both the Palace and the surrounding gardens are strictly prohibited for all travellers. </p> <p>This is due to concerns about the preservation of artwork and the safety of visitors.</p> <p dir="ltr"><strong>Garoupe Beach, France</strong></p> <p>The famous Garoupe beach in southern France banned holidaymakers from taking selfies during the busy season in the middle of summer.</p> <p dir="ltr">The law was first introduced to stop people from bragging about their holiday and just enjoy the stay rather than show off on social media.</p> <p dir="ltr"><em>Image credits: Getty Images</em></p>

Travel Tips

Placeholder Content Image

Lilibet's adorable first birthday cake revealed

<p>The baker who made the Duke and Duchess of Sussex’s wedding cake has revealed a new snap of a 244 floral two-tier strawberry buttercream cake, which was baked fresh for Lilibet’s first birthday.</p> <p>Prince Harry and Meghan Markle enjoyed the summer sunshine and hosted a “relaxed garden party” in June 2022 for their daughter's first birthday in the Windsor estate. The gathering included cake, balloons, party games and picnic snacks.</p> <p>Claire Ptak, the East London baker who made the couples wedding cake in 2018, created other baked goods for the low-key garden party including the cake that was a two tier seasonal strawberry buttercream.</p> <p>She shared a snap of the creation on Instagram, as a part of the 2022 highlights reel saying: “Our 2022 Greatest Hits. Thank you to all our customers and supporters over the last year for inspiring such beautiful work.”</p> <p>"Thank you to my incredible team for executing it all with so much fun, humour and passion."</p> <p>In the snap, she can be seen placing a pink peonie onto the cake, which featured the youngster's name. It was complete with an Amalfi lemon and elderflower filling and covered in a light buttercream.</p> <p>On the bakery's website, the cake is described as having "three layers of vanilla sponge drizzled with elderflower syrup and filled with Amalfi lemon curd."</p> <p>The top and sides of the cake are "iced with a buttercream scented with the juice and zest of lemons from the Amalfi coast, and decorated with chopped candied Amalfi lemon peel."</p> <p>At the time, Claire who owns the bakery and carefully designed the incredible cake - wrote on the brand's Instagram: "It was an absolute pleasure to make this special cake last week for Lilibet’s birthday. Wishing her a very happy year ahead!”</p> <p><em>Images: Instagram</em></p>

Food & Wine

Placeholder Content Image

Can you freeze cheese?

<p>Dairy products are notoriously fussy when it comes to freezing. But when there’s a great sale at the supermarket, it’s hard to resist the siren call of a big discounted brick of cheese. It doesn’t last forever in the refrigerator, but can you freeze cheese?</p> <p>Yes – sometimes! The general rule of thumb is that freezing cheese will likely change its texture. If you do opt to freeze extra cheese, its best use after thawing is for cooking– the texture change becomes a moot point after it’s all melted. You probably don’t want to freeze the fancy stuff you bought for snacking on with homemade crackers, though. But frozen cheese, once thawed, would be perfect in a cheesy bake or casserole recipe.</p> <p><strong>Can you freeze mozzarella?</strong></p> <p>Blocks of mozzarella or shredded mozzarella are fine to freeze, though they tend to have a crumbly texture after freezing. Just avoid freezing fresh mozzarella, as its high water content has a likelihood of forming ice crystals.</p> <p><strong>Can you freeze cottage cheese?</strong></p> <p>Cottage cheese, along with ricotta cheese, can be frozen. However, upon thawing, both cheeses are likely to have a grainier texture. As with most frozen cheeses, thawed cottage and ricotta cheeses are best used in baked or cooked recipes.</p> <p><strong>Can you freeze cheese slices?</strong></p> <p>Yep! For prepackaged sliced cheese, just pop the package into a freezer bag and place it in the freezer. For deli-sliced cheese, place a piece of parchment paper in between each slice of cheese. Then wrap the cheese in freezer paper, tape shut and place the whole package in a freezer bag or freezer-safe container.</p> <p><strong>Can you freeze shredded cheese?</strong></p> <p>For prepackaged shredded cheese, place the package in a freezer bag before putting it in the freezer. For cheese you shred or grate yourself, place it in a freezer bag and carefully remove as much air as possible from the bag.</p> <p>This article originally appeared on <a href="https://www.readersdigest.com.au/kitchen-tips/can-you-freeze-cheese-yes-heres-what-you-need-to-know" target="_blank" rel="noopener">Reader's Digest</a>.</p> <p><em><span style="color: #444444; font-family: Raleway, sans-serif, 'Helvetica Neue', Helvetica, Arial; font-size: 16px; background-color: #ffffff;">Image: Getty</span></em></p> <p><em><span style="color: #444444; font-family: Raleway, sans-serif, 'Helvetica Neue', Helvetica, Arial; font-size: 16px; background-color: #ffffff;"> </span></em></p>

Food & Wine

Placeholder Content Image

The Ultimate Mac and Cheese

<p dir="ltr">The crumbly top is the perfect partner for a decadent cheese sauce. </p> <h2 dir="ltr">Ingredients</h2> <p dir="ltr">• 400g dried macaroni</p> <p dir="ltr">• Melted butter, for greasing</p> <p dir="ltr">• 1 bunch chives, chopped</p> <p dir="ltr">• Sea-salt flakes and freshly ground white pepper, to season</p> <p dir="ltr">• 1 thick slice sourdough</p> <p dir="ltr">• 70g cheddar, grated</p> <p dir="ltr">• 20g butter, melted</p> <p dir="ltr"> </p> <p dir="ltr">Cheese sauce</p> <p dir="ltr">• 40g butter</p> <p dir="ltr">• 1 brown onion, roughly chopped</p> <p dir="ltr">• 4 rashers (250g) rindless bacon, thinly sliced</p> <p dir="ltr">• ¼ cup plain flour</p> <p dir="ltr">• 3¼ cups milk</p> <p dir="ltr">• 180g cheddar, grated</p> <h2 dir="ltr">Method</h2> <ol> <li dir="ltr" aria-level="1"> <p dir="ltr" role="presentation">Cook macaroni in a large saucepan of salted boiling water following pack instructions. Drain well, then return macaroni to pan.</p> </li> <li dir="ltr" aria-level="1"> <p dir="ltr" role="presentation">Preheat oven to 180°C. Grease an 8-cup capacity baking dish with melted butter.</p> </li> <li dir="ltr" aria-level="1"> <p dir="ltr" role="presentation">To make cheese sauce, melt butter in a large deep frying pan over a medium heat. Add onion and bacon and cook, stirring, for 5-10 minutes or until onion has softened. Add flour and stir until combined, then cook for a further 2 minutes. Remove pan from heat and gradually add milk, stirring continuously until smooth and combined.</p> </li> <li dir="ltr" aria-level="1"> <p dir="ltr" role="presentation">Pour sauce over macaroni, then add chives and stir to combine. Season with salt and white pepper, then transfer macaroni and sauce mixture to prepared dish.</p> </li> <li dir="ltr" aria-level="1"> <p dir="ltr" role="presentation">Process sourdough in a food processor until crumbs form. Transfer crumbs to a small bowl, then add cheddar and melted butter. Stir to combine.</p> </li> <li dir="ltr" aria-level="1"> <p dir="ltr" role="presentation">Scatter crumb mixture over macaroni and bake for 25 minutes or until golden. Serve immediately.</p> </li> </ol> <p dir="ltr">Cook’s tips</p> <p><span id="docs-internal-guid-a7d76719-7fff-5dfd-78a0-e2c24c95b0c4"></span></p> <ul> <li dir="ltr" aria-level="1"> <p dir="ltr" role="presentation">Add an adequate amount of salt when to your water when boiling your pasta. Well seasoned pasta is the key to great mac and cheese.</p> </li> <li dir="ltr" aria-level="1"> <p dir="ltr" role="presentation">Always opt for smaller varieties of pasta, preferably hollow to hold plenty of that irresistible cheesy sauce. Elbow pasta is the classic choice but other shapes including fusilli, conchiglie or farfalle work as well.</p> </li> <li dir="ltr" aria-level="1"> <p dir="ltr" role="presentation">Perfect your bechamel. Remember to constantly stir the sauce and cook off the flour well. Making sure the milk doesn’t boil is vital, and when adding your choice of grated cheese, do it in stages ensuring it melts completely before adding more.</p> </li> <li dir="ltr" aria-level="1"> <p dir="ltr" role="presentation">If you do have some spare cream in the fridge, replace some of the milk with it for a richer and silkier bechamel.</p> </li> <li dir="ltr" aria-level="1"> <p dir="ltr" role="presentation">To elevate the flavour profile of your dish, add some spices or extra ingredients. Try mustard powder, garlic, chilli or nutmeg.</p> </li> <li dir="ltr" aria-level="1"> <p dir="ltr" role="presentation">Don’t limit to yourself to one type of cheese, try adding a trio. Whether it’s gruyère, brie or even something stronger like blue or parmesan.</p> </li> <li dir="ltr" aria-level="1"> <p dir="ltr" role="presentation">This recipe already incorporates bacon, but if you want to make it meat-free, try adding sautéed mushrooms, seasonal herbs, caramelised onions or even sundried tomatoes.</p> </li> </ul> <p><em>Image: Better Homes & Gardens</em></p>

Food & Wine

Placeholder Content Image

A red velvet twist on the classic marble cake

<p dir="ltr">Perfect for a Sunday morning, or if you want to make a final impression at your next dinner party, the options are endless. </p> <p dir="ltr"><strong>Serves:</strong> 8</p> <p dir="ltr"><strong>Prep and cooking time:</strong> 1 hour, 20 minutes</p> <p dir="ltr"><strong>INGREDIENTS</strong></p> <p dir="ltr">Cake</p> <p dir="ltr">320g plain flour</p> <p dir="ltr">40g cornflour</p> <p dir="ltr">2 tsp baking powder</p> <p dir="ltr">½ tsp salt</p> <p dir="ltr">225g butter, softened</p> <p dir="ltr">500g caster sugar</p> <p dir="ltr">100g Greek-style yoghurt</p> <p dir="ltr">1 vanilla bean pod</p> <p dir="ltr">5 large eggs</p> <p dir="ltr">120ml milk Red velvet swirl</p> <p dir="ltr">30g unsweetened cocoa powder</p> <p dir="ltr">75g milk</p> <p dir="ltr">1 tbsp red food colouring</p> <p dir="ltr">Lemon drizzle icing</p> <p dir="ltr">Juice of 1 lemon</p> <p dir="ltr">225g icing sugar, sifted</p> <p dir="ltr"><strong>METHOD</strong></p> <p><span id="docs-internal-guid-733ac1fe-7fff-3c9a-09c1-c737b138e132"></span></p> <ol> <li dir="ltr" aria-level="1"> <p dir="ltr" role="presentation">Preheat oven to 180°C. Grease and flour a 26cm (10-cup capacity) Bundt tin.</p> </li> <li dir="ltr" aria-level="1"> <p dir="ltr" role="presentation">In a mixing bowl, whisk together flour, cornflour, baking powder and salt.</p> </li> <li dir="ltr" aria-level="1"> <p dir="ltr" role="presentation">In the bowl of a stand mixer fitted with a K beater attachment, beat together butter, sugar, and yoghurt until well combined.</p> </li> <li dir="ltr" aria-level="1"> <p dir="ltr" role="presentation">Split the vanilla bean down its length with a paring knife. Scrape out the seeds and add to the stand mixer bowl.</p> </li> <li dir="ltr" aria-level="1"> <p dir="ltr" role="presentation">Add eggs one at time, mixing well after each addition.</p> </li> <li dir="ltr" aria-level="1"> <p dir="ltr" role="presentation">Turn the speed to low and stir in the flour mixture until just incorporated. Stir in milk until combined.</p> </li> <li dir="ltr" aria-level="1"> <p dir="ltr" role="presentation">In a separate large bowl, stir together 2½ cups of the batter, cocoa powder, milk, and red food colouring until well-combined.</p> </li> <li dir="ltr" aria-level="1"> <p dir="ltr" role="presentation">Add 1/3 cup plain batter and then 1/3 cup red velvet batter on top. Continue alternating batters, working your way around the tin, until batter is finished.</p> </li> <li dir="ltr" aria-level="1"> <p dir="ltr" role="presentation">Bake for 50-60 minutes, or until a wooden skewer inserted into the centre comes out clean.</p> </li> <li dir="ltr" aria-level="1"> <p dir="ltr" role="presentation">Cool cake in the pan on a wire rack for 15 minutes. Invert the cake onto a wire rack, and cool completely.</p> </li> <li dir="ltr" aria-level="1"> <p dir="ltr" role="presentation">To make the lemon drizzle, mix the lemon juice with the icing sugar until smooth. Pour over the cooled cake. Slice and serve.</p> </li> </ol> <p><em>Image: Better homes &amp; Gardens</em></p>

Food & Wine

Placeholder Content Image

How to bake your pup a birthday cake

<p dir="ltr">This recipe makes one dog cake and can be served as a full meal (based on a medium size dog 10-25 kg), however, we encourage sharing amongst other furry friends or cutting a slice as a treat only. </p> <h4 dir="ltr">Dog cake recipe</h4> <h4 dir="ltr">What you'll need</h4> <ul> <li dir="ltr" aria-level="1"> <p dir="ltr" role="presentation">Chopping board</p> </li> <li dir="ltr" aria-level="1"> <p dir="ltr" role="presentation">Knife</p> </li> <li dir="ltr" aria-level="1"> <p dir="ltr" role="presentation">Cake stand</p> </li> <li dir="ltr" aria-level="1"> <p dir="ltr" role="presentation">Bowls</p> </li> <li dir="ltr" aria-level="1"> <p dir="ltr" role="presentation">Spoon</p> </li> </ul> <h4 dir="ltr">Ingredients</h4> <ul> <li dir="ltr" aria-level="1"> <p dir="ltr" role="presentation">300 g Glow Raw Adult Australian Kangaroo dog food (or any preferred flavour)</p> </li> <li dir="ltr" aria-level="1"> <p dir="ltr" role="presentation">4 salmon skin dog treats</p> </li> <li dir="ltr" aria-level="1"> <p dir="ltr" role="presentation">9-12 mixed berries (mixture of raspberries, blueberries and strawberries)</p> </li> <li dir="ltr" aria-level="1"> <p dir="ltr" role="presentation">10 strawberry yoghurt drops</p> </li> <li dir="ltr" aria-level="1"> <p dir="ltr" role="presentation">1 tsp melted coconut oil</p> </li> <li dir="ltr" aria-level="1"> <p dir="ltr" role="presentation">1 tsp pumpkin seeds</p> </li> </ul> <h4 dir="ltr">Method</h4> <p><span id="docs-internal-guid-d3b8966e-7fff-2340-4098-edebe3d7b817"></span></p> <ol> <li dir="ltr" aria-level="1"> <p dir="ltr" role="presentation">Create three 1cm thick patty slices out of the Glow Raw Adult dog food.</p> </li> <li dir="ltr" aria-level="1"> <p dir="ltr" role="presentation">Melt the strawberry yoghurt drops.</p> </li> <li dir="ltr" aria-level="1"> <p dir="ltr" role="presentation">Place one patty slice on a cake stand.</p> </li> <li dir="ltr" aria-level="1"> <p dir="ltr" role="presentation">Top with two crumbled salmon skin dog treats.</p> </li> <li dir="ltr" aria-level="1"> <p dir="ltr" role="presentation">Place second patty slice on top.</p> </li> <li dir="ltr" aria-level="1"> <p dir="ltr" role="presentation">Top with another two crumbled salmon skin dog treats.</p> </li> <li dir="ltr" aria-level="1"> <p dir="ltr" role="presentation">Place third patty slice on top.</p> </li> <li dir="ltr" aria-level="1"> <p dir="ltr" role="presentation">Drizzle the melted yoghurt drops over the top and sides of the cake.</p> </li> <li dir="ltr" aria-level="1"> <p dir="ltr" role="presentation">Top with mixed berries.</p> </li> <li dir="ltr" aria-level="1"> <p dir="ltr" role="presentation">Drizzle over melted coconut oil.</p> </li> <li dir="ltr" aria-level="1"> <p dir="ltr" role="presentation">Sprinkle over pumpkin seeds.</p> </li> <li dir="ltr" aria-level="1"> <p dir="ltr" role="presentation">Serve. Enjoy!</p> </li> </ol> <p><em>Image: Better Homes &amp; Gardens AU</em></p>

Family & Pets